-It will be a anthropomorphic character bust sculpted in Zbrush. (Below image by Jeremy Gritton)
Wednesday, July 11, 2012
Sunday, July 8, 2012
Portfolio Piece #2: UDK Render of the Librarian
With the amount of work I put into "The Librarian" I wanted to get a really cool render of him, but I wanted that render to be in a game engine to show an ability to make good looking game ready art. I've also had the desire to experiment with the material editor in UDK for some time now. So this portfolio piece combines my thesis (Materials in UDK) with a desire to get a cool real-time render of "The Librarian" in UDK.
This first image shows the extent of my knowledge on lighting and materials in UDK at the start of this project. It shows "The Librarian" in UDK, first with simply diffuse and normal information, second with diffuse, normal, and specular. I included it in this post to show how much stronger applying a basic knowledge of materials and lighting in UDK can make a piece.
The next series of images shows the final product. A posed version of "The Librarian", in a scene, with custom materials and lighting. I created basic materials for the machine on his back and the platform he stands on. The skin material was adapted from Digiteck 3-d's SSS Shader. In creating the materials I spent a lot of time researching subsurface scattering and found insightful, complicated information beyond the realm of anything I've learned before. Take this sentence from "Efficient Rendering of Human Skin" for example, "...based on an empirical observation that sums of Gaussians fit diffusion dipole scattering profiles quite well." Yup... I'll figure out what that means after I get a CS degree or something. In the meantime I'll research "artist friendly" ways to create shaders in UDK.
These next two images show some other shader options I was playing with. In the first image I was experimenting with adding a fresnel to the machine to see what a slight rim would look like. The second is using a simple SSS shader by Nick Zuccarello as a base to see what the material editor was capable of.
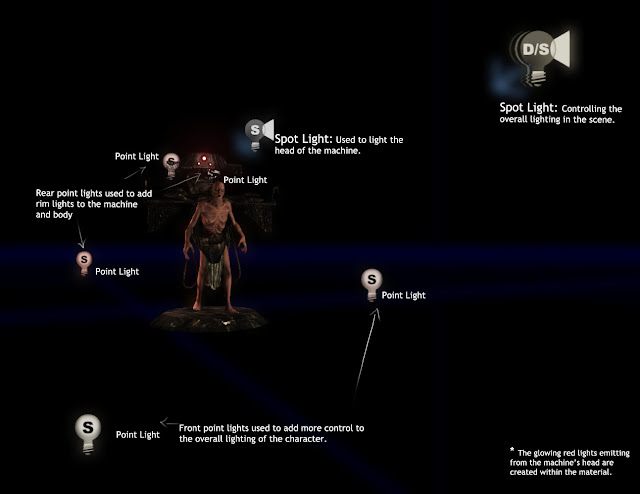
These last few images show my lighting setup along with the materials I made for his machine and platform. I wanted to use this project as an opportunity to learn about the material editor's capabilities so I tried to do as much as possible within the editor rather than using Photoshop to adjust textures. The platform, for example, uses a base stone texture found in UDK and a separate normal map of dirt that is tiled on top of it. Then, using a simple 4 node setup, I turned the diffuse into a spec map and controlled its strength within the editor.

This first image shows the extent of my knowledge on lighting and materials in UDK at the start of this project. It shows "The Librarian" in UDK, first with simply diffuse and normal information, second with diffuse, normal, and specular. I included it in this post to show how much stronger applying a basic knowledge of materials and lighting in UDK can make a piece.
The next series of images shows the final product. A posed version of "The Librarian", in a scene, with custom materials and lighting. I created basic materials for the machine on his back and the platform he stands on. The skin material was adapted from Digiteck 3-d's SSS Shader. In creating the materials I spent a lot of time researching subsurface scattering and found insightful, complicated information beyond the realm of anything I've learned before. Take this sentence from "Efficient Rendering of Human Skin" for example, "...based on an empirical observation that sums of Gaussians fit diffusion dipole scattering profiles quite well." Yup... I'll figure out what that means after I get a CS degree or something. In the meantime I'll research "artist friendly" ways to create shaders in UDK.
These last few images show my lighting setup along with the materials I made for his machine and platform. I wanted to use this project as an opportunity to learn about the material editor's capabilities so I tried to do as much as possible within the editor rather than using Photoshop to adjust textures. The platform, for example, uses a base stone texture found in UDK and a separate normal map of dirt that is tiled on top of it. Then, using a simple 4 node setup, I turned the diffuse into a spec map and controlled its strength within the editor.

Saturday, June 9, 2012
Tuesday, June 5, 2012
Wednesday, May 30, 2012
Wednesday, May 23, 2012
Subscribe to:
Comments (Atom)


